


Showing posts with label crafts. Show all posts
Showing posts with label crafts. Show all posts
Monday, May 21, 2012
Upcycle and Map That Birthday
I thought I'd share another fun gift wrap, perfect for those who love to upcycle. I have an old world atlas book I've been pulling pages out of for various projects. Most recently I decided to use a page to wrap a birthday gift. I used a page that had our actual location on it for a little whimsical fun.


Monday, January 23, 2012
Gong Hay Fat Choi

Happy Chinese New Year.. Wishing you all good health, prosperity and much happiness this year of the dragon.
Today is the first day of the Year of the Dragon. The boys and I had fun with some dragon crafts including this one made with each of their hand prints.
Sunday, November 28, 2010
Race For An Advent Calendar
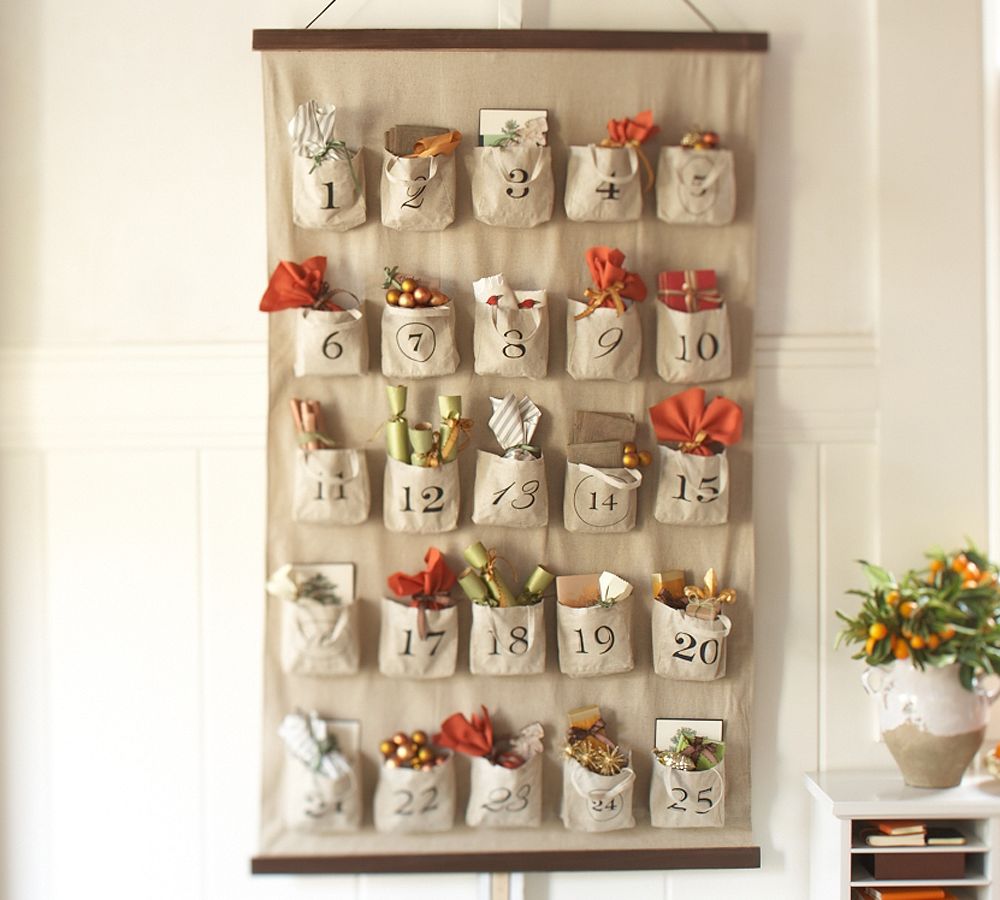
With December 1st just around the corner, I'm determined to have an advent calendar for the boys. I found this one I just love but am a little sticker shy. Now really $99, just think of the goodies I could buy to fill it up for that much. So I've decided with the surplus of fabrics I have, I'm going to make my own with this design in mind. The only problem, I only have a few days to make it, so I'm in a race to finish it and fill it for Dec. 1st. Wish me luck!
Saturday, November 27, 2010
A Good Rainy Day


We filled today with fun indoor activities, and a bit of fun outdoor puddle stomping too, keeping everyone happy all day. The day started off with a trip to the Academy of Sciences followed by a yummy lunch at Park Chow, a favorite restaurant in our old stomping grounds and ended the day with some watercolor fun. The boys have been enjoying this art kit from Uncle Steve and Uncle Tom, thank you. It was just the perfect thing for a rainy day. I love days like this, when everything goes smoothly and everyone has a good time, especially on wet days like today. It was a good rainy day.
Friday, November 12, 2010
Castle Fun


Miles and Liam loved this birthday gift they got from friends. We set it up on the front porch and they were entertained with some crafty make believe fun for quite awhile. They discussed what colors things should be and went at it. They loved getting inside it and playing, first they were knights, then they were wizards. This was just cardboard with a picture on it and markers. I love how some of the simplest things are so much fun.
Thursday, August 12, 2010
Meet The Monsters

Meet the "Dark Blue Grrrster", "Milesbot 3000", and Z'Sun'z. These monsters enjoyed themselves searching for moon rocks, flying spaceships and just having silly fun.

I'd forgotten about this Hallmark Make-A-Mask kit that included sticker activity. I found this unopened kit at a thrift store quite some time ago for .30 cents. I came across it again today while digging around in my craft stash for some fun for the kids. This was lots of creative fun making the masks as well as, making up silly monster, robot, alien stories. Masks are fun and easy to make even without a kit and sure makes for good make believe play. As for this kit, it sure was .30 cents well spent.
Monday, July 19, 2010
Rules of the Wrap

I know I've said it many times but I really enjoy wrapping presents...there's just so many possibilities that makes it so much fun. But there's a few rules I like to follow when I wrap a kids gift. Especially, when you're wrapping a toddlers to let's say 4 yrs old, young kids just love bright colors. So, I try to wrap with fun brightly colored patterns and if there's more than one item I wrap them separately in coordinating wrap. Why wrap it all up in one box when visually you can make it feel so much more grand for them. If you're thinking for green reasons, there's so many possibilities that are still earth friendly. Repurposed papers such as Sunday comics, old maps and children's art work, gift wrap made from recycled paper or even fabrics that can be reused/repurposed. Be creative, if their birthday is in the summer you could use a bright colored beach towel...you get the idea. Same goes for the ribbon. Some of my favorites are raffia (comes in so many colors), grosgrain and satin ribbon that can always be reused for something else. I try to stay away form the plastics, curling ribbons and bows that end up in our land fills and harming birds. Why just slap a bow on it when you can embellish it with so many other fun items whether it's pretty ribbon, or another fun little toy.

This age is also around the time when kids start to recognize their name in print and get so excited when they see it. For this reason, I love to make sure I tag the gift with their name in large print. What's more exciting for a little kid than receiving a fun colored package that has there name on it? Well I guess maybe opening it! Yippee! I usually just use a shipping tag that I embellish with stickers, stamps, or markers. When you make your own tags, it's so much more personal, made for that specific individual, you can't get more personal than that.

So those are just a few of the things I keep in mind when wrapping a gift. Most importantly, have fun with it, you can't wrong when it's your own creation.
Thursday, May 13, 2010
Artful Thursday: Cake Time


One of Aidan's classmates is celebrating her birthday tomorrow. We (Aidan and I) decided to give her a small gift in recognition of her special day. When it came time to wrap this gift, I realized I had robots, trucks, sports and a masculine plaid paper, but nothing for a girly girl. I guess that's what happens when you have 3 boys. So I decided I would make her gift wrapping and..... what perfect timing with Artful Thursday.

Using supplies on hand, this is what I was able to come up with. I had a kraft paper bag, scrapbook paper, glitter left over from valentine's day, PITT art markers, rhinestone and tag embellishments. It all came together to make a whimsical birthday cake.


Thursday, May 6, 2010
Artful Thursday: Mama's Got a New Necklace

In one of my previous lifetimes, I use to make jewelry and sold it at various venues. It sure was a fun past time, this was all prior to kids of course. Anyways, it stands to reason that I still have oodles of inventory, and with Artful Thursday's challenge to use your supplies, I decided I was going to use some of these goodies I've been

I selected a few items, some fresh water pearls, turquoise, small faceted silver beads, suede cord and silver chain and decided to make myself a new necklace.


Picking up the tools was foreign after letting so much time go by, but it didn't take long before I was in the groove of things. It actually felt good to have my tools out, to be making jewelry. I just might have to make a few more. Thanks to artful Thursday for inspiring me to use my supplies.
Thursday, April 22, 2010
Artful Thursday: Some Earth Day Goodness

A little earth day fun today for Artful Thursday. With Mother's day around the corner, I made a small gift using recycled/ repurposed goods. This set of note cards came together with just a few things I dug up out of my stash. I must add, it feels good to use some of those things I've been


With some pinking shears and spray adhesive, I cut squares of fabrics, matted them with a coordinating cardstock, then attached them to a blank note card. I attached a vintage button laced with organza ribbon using a glue dot and there you have it a set of 4 little note cards, perfect for a thank you, a thinking of you, or just a little hello.
Some other things I did today to honor earth day, I cleaned out our medicine cabinet and took the old medications to a medication disposal site. I found one at Pharmaca (BTW love this pharmacy). Doing my part in keeping our meds out of our groundwater, streams etc. Here's a place where you can read about proper med disposal.
The other thing I did today was purchase a reusable water bottle. I had returned my old water bottle (SIGG) when I found out it was lined with BPA and had not replaced it yet. Just a few small steps to living green.
Thursday, March 25, 2010
Artful Thursday: Robots Love Birthdays

This Artful Thursday was the perfect opportunity to make some giftwrap decor to add some fun to our friend Xabi's birthday present. Xabi is turning 3 and I know my 3 yr olds love robots, so I decided to make a robot gift tag for Xabi's presents.

I pulled out my little carry all of craft tools and random things (cutting mat, paper cutter and stamps) that I keep handy in my pantry. Pulled out some bright colored (tropicals) cardstock and got to work. With some cutting, drawing with PITT art markers, a few brads, foam tape, a bit of glitter, and a Zoodle font this little robot came to life.
Thursday, March 18, 2010
Artful Thursday: Happy Spring

Today was a gorgeous day. I think it may have hit 80 degrees here. I picked up the boys from school and we zipped on over to the park to soak up some sunshine and just played for 2 hours. It was such a refreshing moment after all those dreary days of gray skies and rainfall. We definitely were thrilled with the day's warmth. After leaving the park the boys wanted to go for a ride with the windows down and sun roof open to let the warm air just whip through their hair...It was sweet to look in the rear view mirror and see them all with huge grins on their faces, a look of glee. A "Happy Spring" moment for sure.

"Happy Spring" was the theme for today's Artful Thursday project. I pulled out a bunch of items (vintage sheet music, spring themed scrapbook papers, vintage bunny illustrations, German glass glitter, flower shaped chipboard, bright colored inks, felt adhesive letters) that gave me some spring inspiration.

With a bit of glue, a pair of scissors and a black brush tipped PITT artist pen I suddenly had this spring themed collage. I was going to put some grommets on the top corners to hang this with ribbon but,I think I may put it in a 12 x 12 frame. Here's wishing you all a "Happy Spring.
Thursday, March 4, 2010
Artful Thursday - Vintage Inspired Easter Tags; A Tutorial

It's true that I've had the winter blues, I've not quite been feeling myself. So, I'm really looking forward to Spring and all it's beauty that comes with it. Chirping birds, blue skies, the greenness and blooming of flowers, all of this beauty lifts my spirits and brings a smile to my face. Today is Artful Thursday...and I'm dreaming of Spring and Easter. So, I've made some vintage inspired Easter Tags.

Materials I used for this project:
- vintage sheet music
- white cardstock
- shipping tags
- German glass glitter
- decorative pearls
- watercolor pencils
- chalk ink
- mohair yarn
- glue, and foam squares
This was a fairly quick and simple project.

- Stamp the egg on cardstock and trim the egg out
- Color the egg with water color pencils and use a damp q-tip to blend the colors
- Using another q-tip edge the egg with glue and then rolled it in glass glitter
- Stick a strip of pearls on

- Tear some rectangles of sheet music to fit the shipping tags
- Crumple the sheet music, smooth it out, then glue it to the shipping tag.
- Ink the shipping tag & sheet music by rubbing the ink pad lightly over the front and edges of tag.

- Using foam squares, adhere the egg to the shipping tag.

- And finally, switch out the tag string with the mohair string/yarn.


Use these to dress up a hostess gift, tie around a bottle of wine, attach it to an Easter basket...so many other possibilities. I'm sure you can think of all sorts of other ideas. I have always loved the gift wrap as much as the gift itself.
You'll find these in my etsy shop.
Thursday, February 25, 2010
Artful Thursday: Pretty Little Vase, A Tutorial

Here we go again, Artful Thursday. My how that day comes quickly. I'm happy to say I actually got something done today. Yay for me! I'm especially pleased because I used some supplies I'd been hanging on to for quite awhile. So here goes...

I started with this pretty little yellow vase that has an antique Victorian design. (This is a newer item that I got not too long ago from Michael's) What I pulled from my stash is the following:
- vintage seam binding
- a hair comb I made about 5 yrs ago, I disassembled for the crystals and fresh water pearls
- a jar of vintage buttons (1 of many)
- German glass glitter
- vintage kite string
- vintage foliage leaves
Getting started:

- I covered the foliage with glass glitter. I did this using a paintbrush, I brushed the leaves with glue then sprinkled with the glass glitter
- I disassembled the hair comb, setting aside a few pieces of crystal leaves and fresh water pearl stamens on gold beading wire.

- I then wrapped the leaves, pearls and crystals around the neck of the vase using glue dots to adhere them in place.

- Pressing my seam binding first, I tied 2 pieces around the vase, making a bow. I often get lazy and don't press my seam binding, regretting it later when the creases fuss up my bows So I'm pretty happy I took the extra step this time.
- I threaded a vintage rhinestone button with vintage kite string.
- I placed a glue dot on the back of the button.
- I tied the string around the vase, adhereing the button to the bow
- And finally, once all this was done I fussed with it all a bit to get everything in place and trimmed the seam binding to the length I wanted it.


There you are, a pretty little vase to dress up a corner in your home or a sweet gift for a friend. You can find this one in my etsy shop.
Thursday, February 18, 2010
Artful Thursday - "Happy Faces Bloom There"

It's that time again...Artful Thursday. This day seems to be creeping up on me each week. The morning arrives, I start to

I'll share what I started. Today I worked on this mixed media collage. I started with an 8 x 10 canvas that I dry brushed with raw umber acrylic paint. I then glued vintage sheet music using Modge Podge. Using acrylic paints, I painted cherry blossom branches. I then glued a scrap of embroidered vintage linen and an image of a bird that I cut out from a vintage children's book. At this point, I ran out of steam . It's a good start though and I'm happy with it thus far. Feels good to be pulling out the stash, brushing off the dust, and working with it. A nice sense of creative productivity, exactly what I was hoping for when I took on the Artful Thursday challenge.
Thursday, February 11, 2010
Artful Thursday: An Art Full Day For The Kids


Today is Artful Thursday, I've taken on the Julie Collings challenge. However, I'm sad to say I didn't meet that challenge today (sigh). I had an art full day preparing for Aidan's kindergartner valentine party and preparing valentines for all 3 kids. Have to say, I'm positive that's not what Julie had in mind for Artful Thursdays. I really had in mind to dive into some vintage children's books I have and do some collage book markers. It just didn't happen, between assembling 84 valentine cards, yes that's right...I said 84, that's how many classmates my 3 boys have combined together, and 4 gifts for teachers, AND, preparing supplies for 3 separate valentine craft projects for 23 kids, Aidan's class (yes cutting hundreds of strips of paper, 23 posterboard hearts, hundreds of tissue squares, cutting ribbon and making a sample of each project) there just wasn't anytime left to make those book markers. Sadly, it will have to wait for next week.
On another note, I'm thankful for the mom in Aidan's class who agreed to bring in an ice cream cake and relieved me from baking cupcakes because I'd still be baking right now at 11:41 pm.
Subscribe to:
Posts (Atom)

